Ever since this unit came out, I've had interest in getting one for my M Coupe; I just never wanted to pay the $1,500 price tag! The concept is nice: A stock looking navigation system without the tacky huge ass map screen. Once I heard that it was available for $450 from Crutchfield (apparently on clearance; a Traffic Pro II is coming out) I put more thought into it. After hearing that the HK Traffic Pro also improved the sound of the stereo system as a whole, and after seeing that Crutchfield had a "Scratch and Ding" red one (no new ones available) I decided to do it for $383. It arrived without a scratch or a ding! (Probably just a customer return). I looked for installation instructions, and everyone said, "Read this 13 page, 300+ post thread on bimmerfest." Uhh... okay, I did that, but it still didn't have all the info, and certainly not all in order. So I decided to put this page together, for a start to finish install. Thanks to everyone in the above thread, roadfly, and Irv Robinson, especially, for walking me through the install. So let's do it.
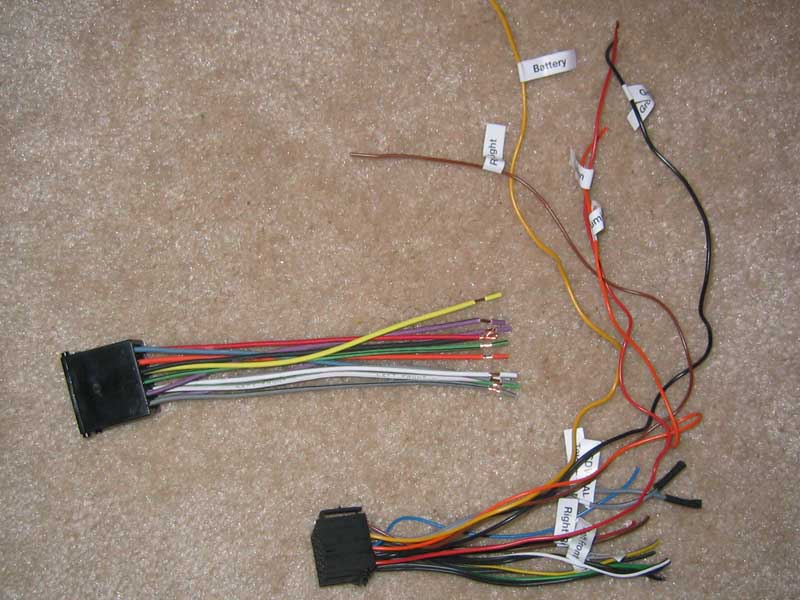
Everyone spoke of the wiring harness that Cruchfield supplied. Turns out they didn't send me one with my unit. After checking a store locally and finding it for $20, I decided to call Crutchfield. They appologized and sent me the BMW harness and the US - Euro antena adapter (didn't even know I needed that). Here's the BMW harness (from Crutchfield) with the Harman Kardon harness:
The first task is to join the two harnesses. There are several methods to do this. 1. Get a blank BMW harness with pins and connect all the wires from the HK harness to it. This is the cleanest method, and also involes the most time and parts. No thanks. 2. Connect the two harnesses by stripping both ends of the wire, twisting them together, soldering the ends together, and taping/heat shrinking over them. I was going to do this, but couldn't find my solder! (Found the iron though). 3. Strip the ends and use crimps to connect the wires. The most ghetto of all, but the easiest! Sweet deal. Finding what goes where is pretty easy. Crutchfield now includes a diagram of the harness with it, and the HK harness has labels on all the wires. Besides the speaker wires, all the other wires (I think) are the same color between the two harnesses. The only wires you don't connect to the BMW harness are the Speed Signal (GAL), reverse lamp (brown wire) and Telephone Mute (grey). I don't need the telephone, so it just dangles, more on the speed signal wire later, and the reverse wire doesn't really need to be connected. To connect it, you need to find the reverse lamp wire in the driver's footwell, and that's just too much work. The general concencus here is that if it's not connected and you're in a tunnel or something (or somewhere the GPS can't see satellites), and you reverse, the unit will think you're going foreward and confuse itself. However, once it can see satellites again, it will correct itself. So, since we rarely back up for extended periods of time, it's fine. However, it does need to be grounded or else it will always think you're in reverse (or something like that). So connect the brown wire to the ground of the BMW harness. Here's my completed, crimped harnesses:

This only took about 20 minutes, including testing every connection with a multi-meter. As you can see, I trimmed the extra long HK wires from the harness so that they were all the same length. In hindsight, I probably should have also trimmed all the ends of the wires almost all the way down to one of the harness so that there wasn't so much excess wire in the dash. So, the only wires left unhooked up are the Tele-Mute, and GAL (speed sensor). Time to move into the car. The instructions tell you to disconnect the battery, but I didn't and I'm still alive (no issues). First, the stock cd head unit needs to come out. This is easy, though I made it hard. You want to flip the two little tabs up on either side of the unit. You can do this with just a finger nail (if you have them), like so:
Underneith each tab is a hex key. Not sure what size, but anyone who has a metric hex key set will have no trouble. Here's the trick... once you start to unscrew them, very quickly there's NO feedback from the screw. It just seems to go completely limp. I thought this meant I was done unscrewing. Sure felt like it... felt like whatever it was screwed into it's now out of, so I tried pulling the head unit out. No dice. No matter how hard I pulled it just wouldn't come out more than 1cm. I tried prying it out with various utensials. Nothing. I stuck my allen wrench in there again and just started spining it like mad cause I was frustrated. Eventually it seems to go tight again! Hmm... I did the same to the other side, pulled, and it came right out! So even if it seems like it's "unscrewed", keep going until it begins giving resistance again. Once it's out, you need to remove the harness from the back of the cd unit. This is a bit tricky. As the diagram on the harness shows (see two pictures down, with the blue wire tap), put a screw driver in the top to loosen it. If yours is easy, it will then slide right up, and you can remove the harness. Most take some monekying, though. I had to flip it over and press on either side of the plastic bracket with a screw driver, alternating sides, in order to slowly jimmy it loose. Also disconnect the antena. You're left with this hanging out of the hole:

The lower right hand socket is for a BMW cd changer. I do not have one so I was not concerned (once I figured out what this was for). But I gather you can not use the BMW changer with the HK unit anyway. The cable on the right is the antena. The next thing that's needed is taping into the GAL speed sensor which is on the female (car) side of the BMW harness. If you want to be really fancy, you can install a pin (BMW pn 61 13 0 007 452, $1.25 retail) on the male side of the harness and then crimp it to the GAL connector on the HK harness. If my two local BMW dealers had the part in stock I would have done that, but they didn't, so I just tapped into the GAL connector (black and white striped wire, coming from pin 10 on the car side harness) on the other side of the car's harness, connected this to an extra piece of wire I shortened from the HK harness, and crimped it to the GAL wire on the HK harness. We have:


Next, I installed the guide pin. It's the little black dildo looking thing on the back of your stock unit. The HK Traffic Pro comes with a little (under an inch of so) metal bit with threads on either side, and a T10 TORX on one end to screw into the HK TP (it's self taping, metal into metal; worked fine). After screwed this in with the Torx wrench, I was left with:
And then screwed the black dildo onto the end. Things were pretty much prepared now, and it was time to start stuffing everything in. The dilemma was to figure out where to put the GPS antenna. I figured I'd just install it on the center of my dash. It'd be a bit ugly, but oh well. I figured the little cover in the center of the dash was a port hole to behind the dash, but after removing it there was nothing under there but a screw. I tried stuffing the antenna wire down the air vent, but that got me nowhere. Hmm. I was looking in the hole left from the head unit wondering if I could just install it under the dash. You can't really get near the top of the dash through that hole though, with a metal support structure in there (you're not suppose to install the antenna with metal above it), and the AC vent above it. Hmm.. how about above the AC vent? YES! After some fiddling I was able to remove the front central AC vent. I didn't want to just yank it for fear of breaking something, so I spent a good 10 minutes fiddling with it and unscrewing various bits. Turns out all you really need to do is yank on it. Put your fingers above the top, and just pull down and out. It comes loose, then out!
Now that it's open, is there a spot for it? Hmm, looks like it. At first I wonder how I'm going to apply the self stick tape to it since it's pretty cramped. It looks as if I can remove the supporting screws to the air duct by sticking a magnetic screw driver (must be a strong magnetic one or you'll never see that screw again) through the head unit port hole and moving the screw driver to the screws. Once it's loose, carefully pull the screw driver out so as to not knock the screw off the head and never see it again. This step probably isn't necessary, but I did it only to the left duct screw and it did give me a bit more room to work with. I wound up just kind of jamming the antenna above the duct. I got it pretty far up there, and it was really tightly lodged between the air duct and the top of the dash. Once I put that screw back, it was really tight. I don't think it will be moving anywhere, even without tape. Time will tell. I also hope this doesn't introduce a rattle. I had to shine a flash light above the duct in order to see the antenna, but you can see it in there!

I then had tons of excess wire, so I just zip tied it together. I then plugged everything into the back of the unit, including the euro antenna adapter that Crutchfield sent, and then the antenna...

Oh yes, before installing the unit you need to be sure that the springs on the Traffic Pro are all the way forward. They talk about this in the installation manual. Once this is set, you can go ahead and stick your unit in the hole (uhhh...). Since there's now quite the rat's nest of wires, be sure you first get all the wires in, and try and push them to the bottom before you slide the unit in. Otherwise, they could get in the way, and get pinched. I think this is what happened with my initial install... Once I put everything together and shut the door and tried to arm the alarm, it just chirped at me three times. The little black dildo apparently wasn't in the guide (as I said, this isn't just a guide, but an alarm sensor). I think one of the wires was blocking it from entrance. Once I took the unit back out and made sure all the wires were down, it apparently slid right in, because the alarm now worked fine. Once the unit was in, I stuck the air vent back in (slides, then clicks right in) and it was done! Viola!

Now the hard part's done. For the remainder of the setup, RTFM! ;-) The manual tells you just what needs to be done to setup the GPS. On initial tracking I got 6 satellites in my neighborhood, so that's good enough for me! The air duct seems to be a fine place for the antenna. I drove around to do the calibration, and once it was done, it went to the default nav screen, so I pulled into a neighborhood street. I typed in my home address and told it to tell me how to get there. It just sat there for a bit saying "calculating route". After a bit I selected "shortest route" or some such thing, and it displayed "off road." Ha, I was on a road newer than the maps. Nice start. I turned around, and once I hit the main street (which was a few yards behind me), the sexy brit told me "Turn left here." It then directed me back home. Neato! That's all I've used the unit so far, so I can't report on how well it functions. I need to RTFM myself to figure out how to use the thing. I also haven't really listened to the stereo at all, so I can't report on whether there is a sound improvement or not. My initial thought is that I didn't really hear one, and I'm a very discriminating listener. But again, I haven't really done critical listening yet. I will report back after a week or sos use with more answers... So far, for the price this thing can't be beat! And I'm certainly glad I got the red instead of amber; just looks sharper.
 back to Traffic
Pro Users page back to Traffic
Pro Users page |
 Esmerelda's Home Page~ Z3ers.com
all material on these pages is copyrighted
Esmerelda's Home Page~ Z3ers.com
all material on these pages is copyrighted
|