
Autocross Trailer Project
for
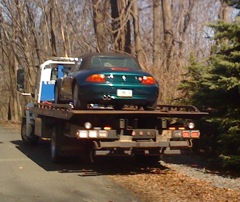
a 1998 BMW Z3 2.8
Doug
Meinen
 January 2003
I first got hooked on Autocross in my 1988 735i. I did manage to place in the BMW CCA Houston Chapters Class "C" for the 2002 Autocross Season. On July of 2002 I found a great deal on a used 1998 Z3 2.8 Montreal Blue at CarMax. I started Autocrossing my Z3 for the last two Autocross events that I was available to attend. I placed in the middle of the pack in Class "A" good but not great
I was first thinking of modifying my Z3 suspension, air intake, exhaust, and power chip. This would have given me more power and a stiffer cornering. But after watching other Bimmers on the track and reviewed there race results. I came to the concussion that I have plenty of power and suspension with my stock Z3. What I noticed and needed was better tires. By reviewing the results I noticed that less powerful Bimmers with track tires were turning in better times by a wider margin than more powerful Bimmers on street tires
So I took the budget I collected for the power/suspension upgrade. I instead bought Kumho Ecsta V700 with Borbet Type T wheels. Now the question was how do it get the tires/wheel to the track. I just did not want to drive these new tires on the street to the track. For me this was a 100+ miles round trip plus unforeseen road hazard that may come my way. I also am planning to drive in the Autocross at Oktoberfest 2003 in Austin. I needed a better way to get my tires to this event. Driving my Kumho installed on my Z3 to Austin and back is not an option. Seeing other Autocrosser at the track with their trailers looked like a great idea. I found some examples on the Web on building an Autocross Trailer. Most were base on a small Utility Trailer (3 1/2' x 4') from Harbor Freight
But the first thing I need to do was to find a Hitch from my Z3. I found it at HMS Motorsport. It is a Da’Lan Hitch. Once I knew there was a hitch and it was on order. I was able to buy the Kumho, Borbet wheels, trailer kit, and all of the other parts I needed(1) DaLan Hitch (HMS Motorsport)
(4) Kumho/Bortet Type T - Tire Rack
(1) Utility Trailer 3 1/2' x 4' with 12" wheels - Harbor Freight
(1) Trailer Ball æ” by 1 7/8” – Harbor Freight
(2) Cargo Straps kit with two straps 6" long – Wal-Mart
(1) Contico Pro Tuff Box - Wal-Mart
(1) 6' piece of 2"x6" Treated Lumber cut to two 21" pieces - Home Depot
(1) 10' piece of 2" PVC pipe cut to two 3' pieces - Home Depot
(1) 3' piece of angle steel - Home Depot
(4) Master Locks - identically keyed - Home Depot
(4) 3" 3/8" Grade 8 bolts - ACE Hardware
(4) 2 1/2" 3/8" Grade 8 bolts - ACE Hardware
(6) 1" 3/8" Grade 8 bolts - ACE Hardware
(28) 3/8" Grade 8 washers - ACE Hardware
(14) 3/8" Grade 8 locking nuts - ACE Hardware
(1) Hoppy #46255 Converter/Isolator – PepBoys
This project is divided up into three section:
One: Building of the Autocross Trailer
Two: Installation of the Hoppy #46255 Converter/Isolator for my Z3
Three: Installation of the Da’Lan Hitch for my Z3
But first
here a quick snapshot of my brakes upgrades.
Stainless Steel Brake Lines
ATE Slotted Front Rotors
PBR Metal Master front and rear brake pads
ATE Super Blue DOT 4 Racing Brake Fluid
Fortec Red Brake Caliper Paint
BBQ Black Paint for brake brackets
BBQ Silver for front and rear rotors
BBQ Silver for brake anti-rattle clips
The Kumhos just came in and they look Great!
Building of the Autocross Trailer
Here I have the basic frame bolted together. I just snug the bolts on each corner if the frame. I waited until later once the trailer as upright to square the frame and fully tighten each corner bolts. The manual states that the wheel bearing need to be repacked every 3000 miles. The manual was written for the 8" wheel version. I upgraded to 12” wheels. 12” wheels will have fewer turns per mile then the 8” wheels. This will help in good wheel hub maintenance less turns less heat. Plus the 12” wheels will give the trailer a better ride. Before I installed the wheel hubs I removed the hub grease that was already applied to the hubs and bearings. I then repacked the bearings and hubs with new High Temperature Bearing Grease I got from O'Reilly Auto Parts.
The wheel hubs and wheels are installed. I flipped over the trailer and placed it on two jack stands. With the two jack stands and both tires on the ground the trailer is level and stable. I was able to square up the frame and tighten the frame bolts. It also made it easier to wire up the trailer lights and add the wheel fenders.
This is completed base trailer frame. All of the wiring and lights are installed. Plus the fenders are installed. Now it is time to start to add the parts to support my Autocross tires/wheel and toolbox.
I bolted the two 21" long pressure treaded boards to the inner frame lips. You can see that the wood is resting on the two cross member lips and bolted down. As you can see on the backside of the middle cross member there is no lip to support a 3' PVC pipe to act as a part of the tire cradle. I needed to add a lip here.
The toolbox is now bolted to the wood boards. You can also see the 3' long angle steel bolted to the middle cross member. The angle steel was cleaned up with a wire wheel on my drill. Then I clamped it to the middle cross member to mark were I needed to drill the six 3/8" holes. I then painted the angle steel black. I need to install it with the lip facing backward to support a 3' long 2" PVC pipe. I have the back PVC pipe already installed on the back cross member lip with tie wraps. The tires will rest between these two PVC pips with a nice smooth cradle for the tires. The width between the outer frame rails is 37". My wheel stack together has a width of 36 1/2". It just fits!
This is a back/side view of the finished Autocross Trailer. You can see how the PCV pipes provide a nice smooth cradle for the tires. Also I added four large Roundels to each wheel fender and on both side of the toolbox. Plus I add Roundels to each wheel.
Installation of the Hoppy #46255 Converter/Isolator for my Z3
Before I could start on the wiring project I need to locate either a Wiring Converter or a Wiring Converter/Isolator.
The Converter I found is very simple one. The cost is $12.99. This converter is only that, a converter. It will convert the tow vehicle with independent wires for each rear light function over to a share wiring configuration that is needed for an American Style Trailer. I see two problems with the Converter only method. One: Is that the trailer lights will receive it power for it’s lights directly from the light circuits of the tow vehicle. Two: If you develop a problem in the trailer wiring for example a short. This short will be transmitted back into the tow vehicle electrical circuits.
The Converter/Isolator I found cost $39.99. The converter part of this product works just the same as the converter only version only in one way. It will convert the tow vehicle with independent wires for car rear light function over to a shared wiring configuration that is needed for an American Style Trailer. The Isolator part of this product will isolate the tow vehicle electrical circuits from the trailer electrical circuits. Plus the isolator will provide the power and ground to the trailer to run its lights. The isolator will sense any input from the tow vehicle for example the tow vehicle left turn signal well tell the isolator to blink the left turn signal on the trailer.
I found a great spot to install the Converter/Isolator. On the left side of the trunk behind the panel, I found the rear cable hardness. I verified that the color code of the wiring in the Z3 Bentley Manual matched what was really wired the to the rear lights. You can see my Bentley Manual opened up to the wiring pages. Also you can see my Light Probe to test each circuit.
I have the Converter/Isolator installed. I made all of the tail light connection with the wire clip provided with the kit. Also I made the ground connection with the white wire connected to a ground stud and nut located near by. I tie wrap all of the wires to the tow vehicles wire hardness. I still have the red power lead loose. This will be connected to the battery located on the right side of the trunk.
This is the connector that came with the kit. I connected one end to the battery. There was a 10mm nut with another lead already connected. I removed the 10mm nut installed the new connector and replaced the 10mm nut. The black rubber housing on the connector, is an inline 20-amp fuse. Before I connected this battery connector with the Converter/Isolator power lead with the lead wire provided in the kit, I removed the 20-amp fuse.
I have the red power lead connected between the Converter/Isolator and the Battery Connector. I tied wrapped the red power wire to the rear cable hardness the run from the left side of the trunk to the right side of the truck. Once this was done I reinstalled the 20-amp fuse.
Everything is finished. The trailer extension cable will hang out of the trunk and connect to the trailer. When not in use I will locate the trailer extension cable under the trunk floor mat next to the tool tray and battery.
I do not have my hitch installed yet. I just pull the trailer up to my Z3. I left the tongue of the trailer on a jack stand. I then hooked up the trailer lights with the Z3. I then tested each light function. Running Lights/Tail Lights, Brake Lights, Left Blinker, Right Blinker, and Emergency Flashers. Everything works great! I was very happy on how this part of the project came out. I thought this was going to be the hardest part. But it turned out to be the easiest.
Installation of the Da’Lan Hitch for my Z3
Jacked up the rear end of my Z3 to starts my hitch installation. This give me plenty of room to install the Da’Lan Hitch.
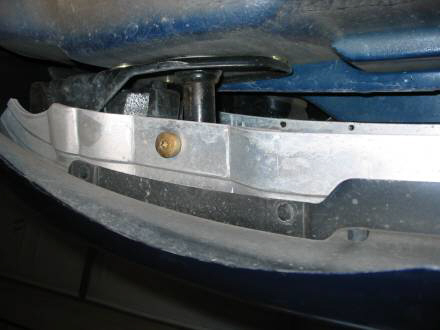
This is one of the bolts that attach the rear bumper to the bumper strut. I am lying down on my back looking up under my rear bumper.
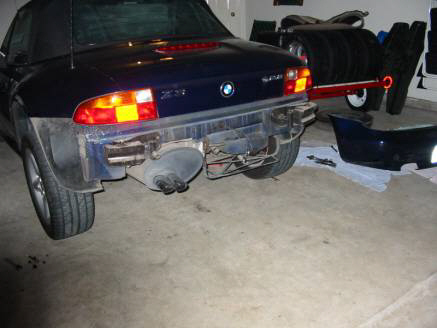
The rear bumper is removed and lying over on the right side behind my trailer. This will give me good access to mount the Da’Lan Hitch.
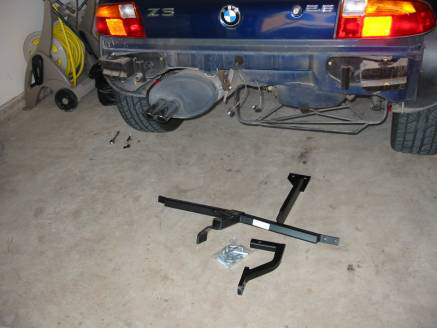
My Da’Lan Hitch arrived and is ready to be installed.
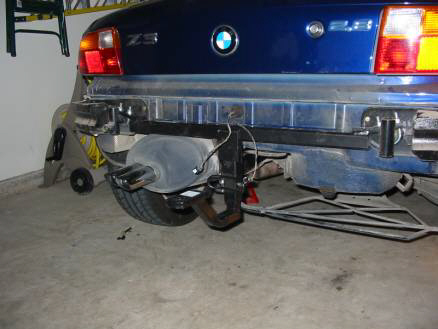
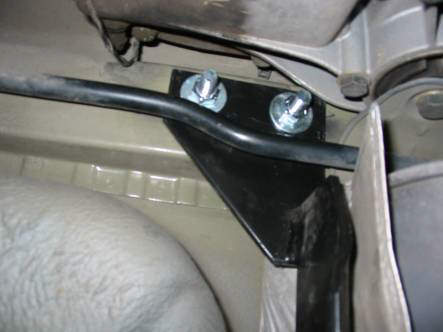
The Da’Lan Hitch is now installed. There are two U-bolts that are attached around the bumper struts.

Here is a close of view of one of the U-Bolts around the bumper strut.
This is the rear-mounting rail that connects the hitch to the rear cross member next to the rear differential. I need to drill two-½” holes to install a U-Bolt to attach the rear-mounting rail. The rod that is under the rear-mounting rail is my rear sway bar.
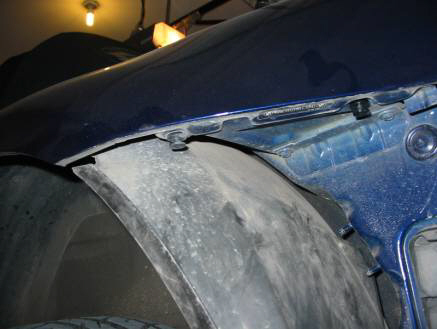
The view here is of my left rear fender area. You can see two plastic studs. The rear bumper valiant hangs from these plastic studs. The clean stud is a new one. I broke two studs. One when I was removing my bumper. One when I was installing my bumper. The part number for these plastic studs is 51 12 8 399 166. I got some extra. My local BMW dealer gave me these studs for free. They told me they go thought a lot of them.
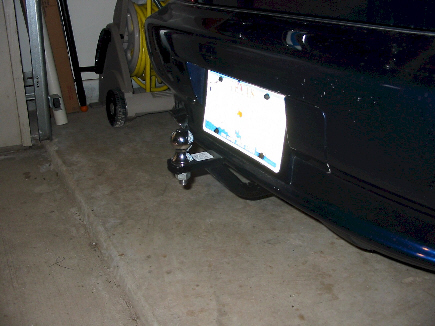
The hitch installed and ready for use.
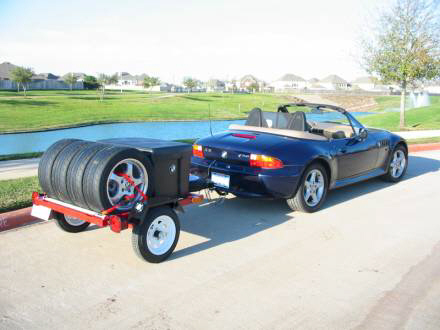
I am Finished! Ready for the Autocross!
If you have questions click HERE to email Doug.
Texas Z3 Logo courtesy of Vince Parsons, Texas Z3 Registry and Z3World.
 Esmerelda's Home Page~ Z3ers.com
all material on these pages is copyrighted
to their authors, all rights reserved
Esmerelda's Home Page~ Z3ers.com
all material on these pages is copyrighted
to their authors, all rights reserved