 v2.0
v2.0In the end, it was good that I had started brushing up on the tire change procedures since the Roadside Ass. guy didn't really know how to do that on a Z3 either. He was amazed that there is no full-sized spare. Where he thought it would fit, I have no idea. So, we got down to business on changing the tire with Michele reading me the manual so I could free the spare and then watch him like a hawk while he jacked up the car, removed wheel and tire carcass, and installed the donut (I figured since he was there he could at least do the dirty work rather than messing up my clothes).
One thing I noted about this experience was that removing the donut
from its cradle is a non-trivial operation, especially if you haven't tried
it before getting stranded on the side of the road. Thankfully, I got to
decipher the instructions at 2pm on a sunny Saturday with the car pulled
all the way over on a 15+ foot shoulder. Would not have wanted to try this
in the rain or dark or without an adequate safety buffer from the oncoming
traffic. When I recounted our ordeal on Bimmer.org, I got a suggestion
to create a "how to" with pictures, so here goes. Pictures are from a simulated
tire change I did on a beautiful Thursday morning during a half hour break
in the middle of a glorious
drive through the East Bay Hills.
| I got some very positive feedback from the first version of this page. One note was a request for better pictures of the steps I had to narrate because of my less than optimal photography skills (from Rachel), and another, like manna from heaven, was a set of great pictures of the process (taken by RichC of Black Manx fame). I love the MB -- ask and you shall receive. There were also suggestions to carry a can of fix-a-flat, work gloves, and a cigarette-lighter-operated jack and tire pump. All are good ideas, but only the gloves and the battery powered jack will help you if your tire ends up looking like mine did. | 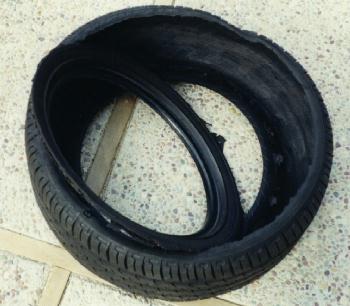 |
For those Z3 owners who like doing everything themselves or those who know better than to rely on the Roadside Asses, here's version 2.0 of Mike's Z3 tire change page:
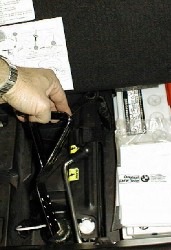
| The tool kit is underneath the rear half of
the trunk floor. Pull up on the strap near the center back and then either
remove the panel (it's held in place by three velcro strip from the underside)
or wedge it in the "up" position like I did.
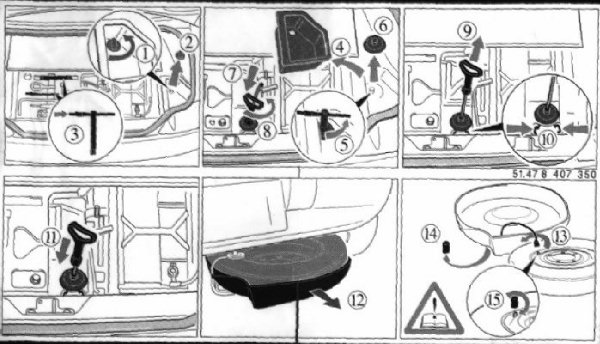
If you wedge the floor panel in the up position, your first instinct might be to say, "Damn, Mike, you made me waste 10 pages printing out your stupid guide for nothing. Those clever BMW engineers explained everything I need for this process in 6 simple, easy to decipher panels detailing 15 straightforward steps right here on the bottom of the panel covering the tool kit." If you can change the tire based solely on this diagram while sitting along the side a road with traffic and who knows what kind of weather distracting you, then my hat's off to you. I am ashamed to say that despite owning three degrees including a Ph.D. in engineering from Cal, I could not, would not manage to change the tire on my Z3 based solely on these instructions. Guess a public school education ain't what it used to be... |
 |
..so I moved on to the owner's manual which describes the process in mind-numbing detail in 7 pages with some nifty gray scale drawings:
|
|
|
|
|
|
|
|
|
|
|
|
|
|
|
|
While the owner's manual is a lot better than the diagram in the trunk, it's not as clear as it could be. So I put together my own "how-to" for changing a tire. Here goes.
Below is a picture of the tool kit in the Z3 roadster. Supposedly, the coupe kit is slightly different (at least that's what page 155 of the manual claims). Those who viewed version 1.0 of this guide will note that you can actually see some detail in the new picture. Rich did a much better job on his photograph than I did. Although it could be that the bright California sun interfered with the automatic exposure control on my camera (not a problem for Rich in frozen New England :o)
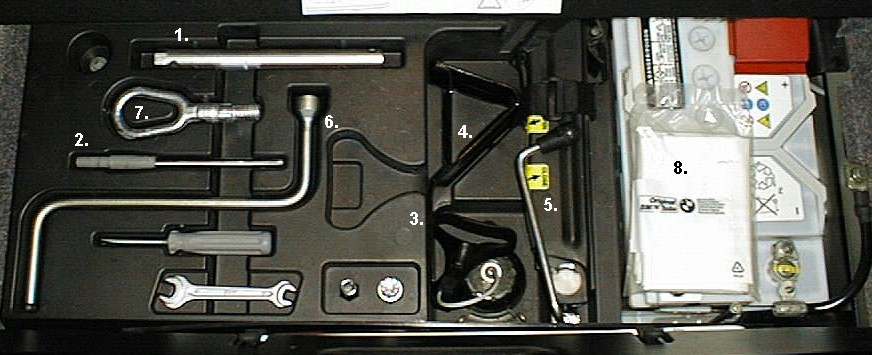
The numbered items are
| A. Put a suitable selection in the CD player or cassette deck. My personal choices for this situation are "Highway to Hell" or "Hell's Bells" by AC/DC or "Welcome to the Jungle" by Guns 'n' Roses, but then I graduated high school in the late 80's, so YMMV. |
No illustration here. If you can't do this step without detailed instruction, please abort the tire changing process immediately (or at least call your insurance carrier to pre file a comprehensive claim and the nearest emergency room to make arrangements for your imminent visit). |
| B. Find the plastic storage bin at the right of the trunk. If it doesn't contain lots of cleaning supplies like Rich's does, don't tell anyone on the MB. You will be branded an unfit Z3 parent and will be ostracized and electronically harassed until you cry or sell your car to a more worthy owner. | 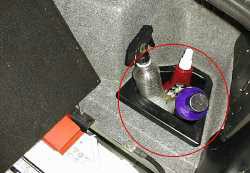 |
| C. Reach into the storage bin and manually unscrew
the plastic nut at the bottom of the bin. Remove the bin and nut from car.
It's best to leave the nut in the bin so you don't lose it.
Look into the hole left by the bin. You should see a bolt held in place by a hex nut. |
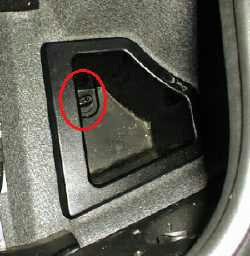  |
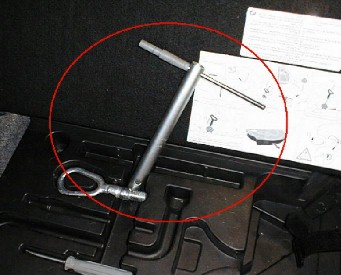
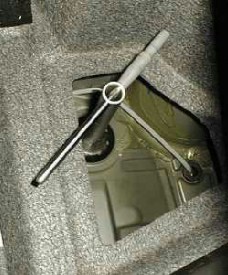
| D. Now it's time to make use of some of those cool
looking tools BMW threw in as part of your Z3 purchase. Take the spark
plug socket wrench (1.) and centering pin/handle (2.) and assemble them
as shown in the first pic to the right.
Then use this gizmo to loosen and remove the nut holding the bolt under the storage bin. I couldn't find a way to conveniently spin the wrench on the nut since the handle kept hitting the wheel well. It was easiest to turn a quarter to a half turn then pull the wrench off the nut and return it to the original position for another partial rotation. Place the nut in a safe place once it's off. Put the socket and handle back in their places so you don't lose them. |
  |
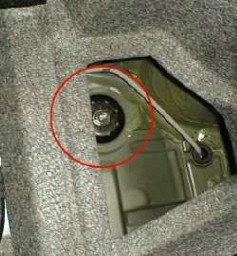
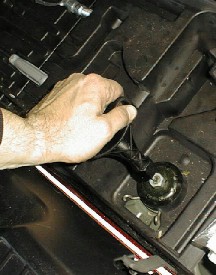
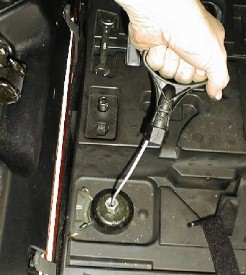
| E. Pull the handle/socket/pull cord combo (3.) out
of its holder. Fit socket onto the hex nut/circular cover in toward the
rear of the car form the tire wedge (4.) and unscrew it. Nut and cover
are threaded onto pull cord, so you can't remove them (or lose them :o).
Once the cover is off, you have reached the tricky part of this operation. Fear not. Pull up on the handle/socket/pull cord (3.) and squeeze the two sides of the metal clip together to release the donut cradle. PLEASE BE CAREFUL THAT YOU HAVE A GOOD GRIP ON THE HANDLE! The donut isn't that heavy, but once it comes loose if you don't have a good grip on the handle it will likely fall on your toes. This will probably hurt a bit, so it should be avoided. |
  |
| F. Now, assuming that you have not already dropped
the donut on your toes, gently lower the cradle to the ground by allowing
gravity to pull the cord through its hole. Voila! There is your spare!
Now all that remains is some standard grunt work. Congratulations, you have defeated the best laid plans of those devious Bavarian Engineers! Now reach under the car and slide the donut and its plastic bin out of the cradle. The bin has a couple of plastic protuberances that are meant to keep it from sliding out of the cradle while you're driving so you may have to rotate the bin slightly to free it. |
 |
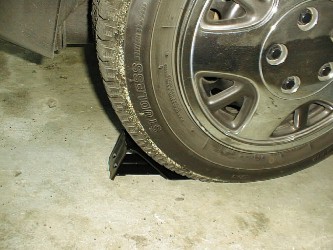
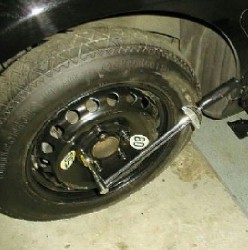
| G. IMPORTANT SAFETY TIP MISSING
FROM VERSION 1.0! From the Z3 owners manual: "Secure the vehicle to prevent it from rolling: Remove the wheel stop (4.) and place it against the rear surface of the front tire opposite the side to be raised" In English, if you're fixing a tire on the left side, put the tire stop behind the right front tire and visa versa. Not sure what you do if you're changing a front tire. If you're on a down slope, the manual suggests putting the wedge IN FRONT of the tire (which seems a lot smarter than putting the wedge uphill of the wheel you're trying to stop). Note to alert readers: Rich took this picture with the wheel stop wedged behind the rear wheel position after the donut was installed. You caught us. We didn't actually take pictures during our real life tire disasters. I'm not a tire changer, I just play one on the web. |
  |
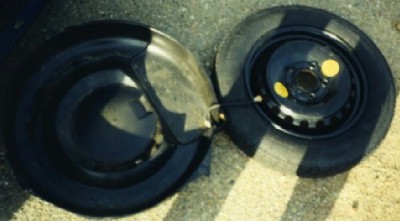
| H. Now that the donut is free of its cradle, find
the spot on the bin where the inflation stem sticks out, then lift the
tire out from the opposite side, and lay it flat next to the bin so that
the pressure hose isn't stressed.
Quickly undo the nut connecting the pressure hose to the tire. There will be a whoosh of air, but if you do it quickly, it shouldn't be a problem as far as deflating the tire. |
 |
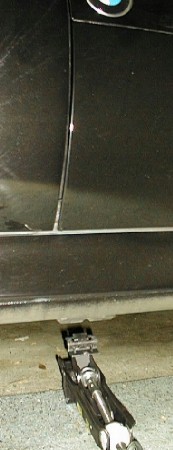
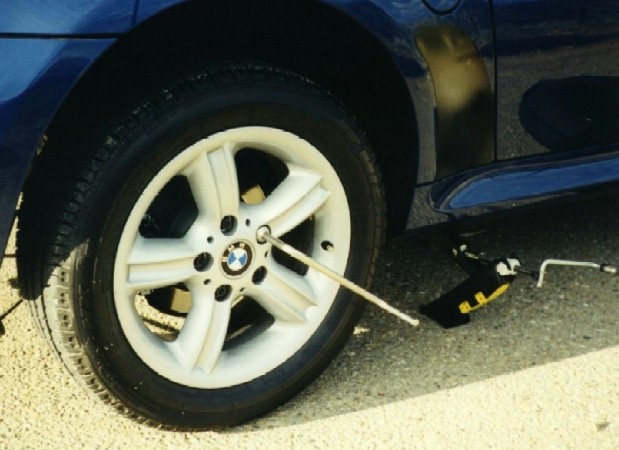
| I. Remove the jack from the trunk and position it
under the appropriate jack point for the damaged tire. If you look at the
smaller of the two jack feet (the larger one is flat and goes on the ground),
it has two perpendicular grooves. These mate up quite nicely with the four
jack points which are in front of the two rear wheels and behind the front
wheels.
Turn the crank clockwise until the top foot is almost to the height
of the underside of the car and then check the position and alignment again
before cranking it the rest of the way. It may be easier to loosen the
lug nuts a quarter turn before the tire lifts off the ground.
|
  |
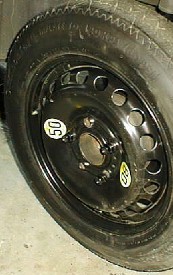
| J. Once the tire is up and off the ground, finish
loosening the nuts and remove the wheel. Lay the wheel on the ground face
up so rocks don't scratch its finish.
Position the donut on the axle. The owner's manual says to use the centering pin (and from the sound of the directions, you use the rubber handle side) in one of the lug nut holes as you position the tire. Then screw in two lug bolts into opposing holes and remove the centering pin. Neither Rich nor I got a pic of this step , and I know I didn't do it when I had my flat. YMMV. Install the remaining lug bolts and tighten them securely before lowering the jack. Go back and tighten the bolts in a diagonal pattern once the tire is back on the ground. Technically, the torque specification is 72 ft.lbs. (100 Nm for you SI types), but I know I don't carry a torque wrench in my trunk. |
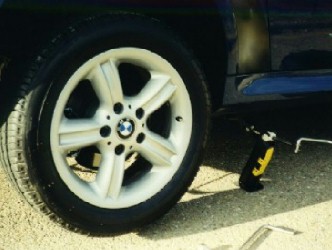  |
| K. Assess how horrible your car now looks with this
donut monstrosity on it. Resolve to remedy this situation as rapidly as
possible. However, bear in mind that the max rated speed for the donut
you now have to drive with is 50 mph (80 kmph). Drive carefully!
Another safety note (from Harvster): You should disable AST, DSC, ASC, etc. (whatever the traction control acronym of choice was at the time your Z3 was assembled) while driving with the donut. |
  |
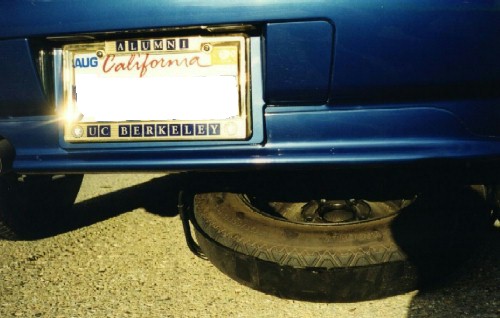
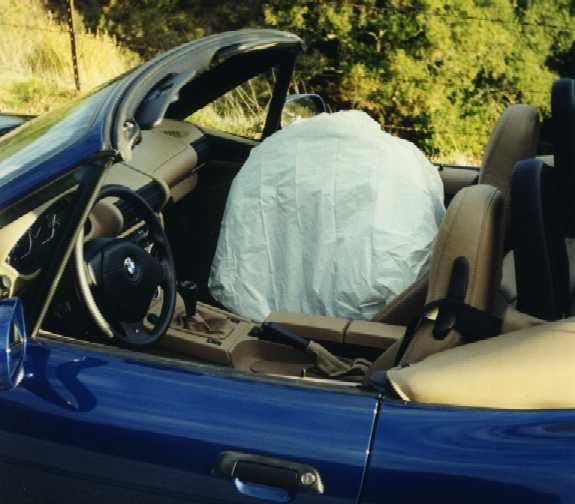
| L. The plastic donut bin isn't supposed to go back
in the cradle according to the manual, so I put the removed wheel in it
and then wrapped the wheel-bin combo in the official BMW white hefty bag
that came with the car (8.).
Since my tire had completely blown up, I could cram it into the trunk (good thing since Michele was occupying the front seat and wasn't keen on holding the wheel). Unfortunately, the plastic bin would not fit in the trunk (at least not if I wanted to reuse it when I replaced the donut), so she held that in her lap. If your tire is mainly intact, chances are it won't fit in the trunk, so it has to ride shotgun as shown to the right. Where a human passenger fits in this scenario is beyond me. Replace the now empty donut cradle by pulling up on the pull-cord/handle until it latches in the metal clip. Shove up on the right side of the cradle until the bolt in the storage bin area comes back up and then replace the bolt and tighten it with the spark plug wrench/handle combo. Tighten the hex nut/circular cover back onto the other bolt using the socket in the pull cord handle. Replace the handle, the wrench, the jack, etc. in their proper places. Note: replacing the cradle may require another person shoving up from outside of the car and as Rachel noted, that presents a problem since you will likely not have room for another human if you want to keep the flat tire/wheel combo when you leave the scene. Guess you have to ask yourself if your passenger at the time of the incident is worth the several hundred dollar bill for replacing the wheel you'll have to leave behind. |
 |
Relax and enjoy a beverage of your choice while the puncture is repaired
or a new tire is installed. Whew!