Traffic Pro Installation
in a Saab 9-3
My Traffic Pro (4773) installation experience is specific to a 2000 Saab 9-3 Base, but I believe many of the lessons I learned would also apply to a late generation Saab 900, a Saab 9-5 and or a new generation Saab 9-3.
Before you even start, get the parts and tools that are needed:
DIN radio removal tool (available from Crutchfield for $4.99)
Harness Adapter (400102323)
¾ DIN Cubby/radio fill kit (4822235)
Torx T-25 Screwdriver
The Saab parts are from Saab Europe and can be obtained from www.genuinesaab.com in the US and www.partsforsaabs.com in the UK. These part numbers are only for 9-3s, other kits are available for other models. You can also buy a VW/Audi harness, but be advised it has a couple of extra leads for the CAN Bus system, which should not be connected.
The first thing to do is decide if you plan to sell the OEM radio or save it to return to your car prior to trading or selling the car. If you plan to sell the OEM radio you will need to take it to a dealer or an indy with a Tech 2 device and get the radio ñdivorcedî from the car. If you donÍt do this it will be useless until it is returned to your car. Older Saabs had code entry radios and this does not apply. Be advised that if you have a Saab CD changer it will not work with the Traffic Pro.
You should make up the harness before you start the actual removal/installation process. The harness is a female receptacle for DIN plugs A and B which are already in the Saab. You need to connect the harness adapter you purchased to DIN plugs A and B on the Traffic Pro. Plug A is the power plug and Plug B is the speaker plug. I soldered all connections and used heat shrink tubing. I think soldering is imperative for reliability but one could use electrical tape instead of heat shrink tubing.
The Saab color codes are supposed to be as follows, but my car had the colors for the ignition and constant +12 VDC reversed, so check that with a test light or voltmeter before you make up the harness:
Plug A Color Codes
Function Traffic
Pro Saab
Constant +12 VDC Yellow Red
Ground Black Black
Ignition (Switched +12VDC) Red Yellow
Power antenna/amplifier trigger Blue Blue
Illumination Orange Orange
Plug B is only for the speakers and the pin-outs are the same as the original so you could simply plug in the original Saab Plug B. Since the harness I purchased had Plugs A and B molded together I soldered the corresponding leads between the two. If you used a VW/Audi plug, just use Plug A and plug the Saab Plug B directly into the Traffic Pro. There is a plug C in the Saab but DO NOT connect this to the radio. It interfaces the original Saab radio with the I-Bus and the SID and is not compatible with the Traffic Pro. If you have the optional Aux In adapter or plan to use line outputs to an amplifier you should insert those plugs in socket C on the Traffic Pro.
Plug B Color Codes
Speaker Traffic
Pro (+-) Saab
(+-)
RR Violet/Black-Violet Red/White-Blue/White
FR Grey/Black-Grey Red-Blue
FL White/Black-White Brown-Green
RL Green//Black-Green Brown/White-Green/White
One other connection to the plug A will be required and that is the GAL/speed signal to terminal 1. You can connect a reverse signal to terminal 2, but I did not do this based on advice seen on the Becker Board. The speed signal is available several places including at the ABS module in the engine compartment or behind the speedometer. After failing in my attempt to feed a wire from the ABS through the firewall I decided to look for an easier spot to access in the cockpit. With help from Anders at Swedecar.com I found a connection point in the driveÍs foot-well on the A pillar.
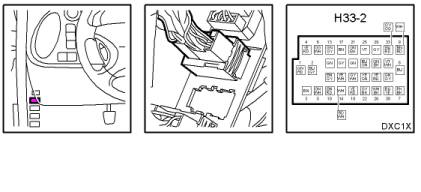
For a speed signal, simply connect to the orange-white wire on socket H33-2 shown above. In this case I used a snap connector vice soldering as I did not want to risk damaging the other wires in the bundle. That is the only connection which I did not solder. Run the new GAL/speed signal line up to the area behind the radio. I found this was easiest to do if I removed the lower panel under the dash. This requires a Torx T-25 screwdriver and removal of five or six screws. The panel will then drop down and you can run a wire over it and get it up to the radio area. I actually fed mine down after I removed the radio.
While you have your T25 screwdriver handy, drop the glove box down and you can run the cable for the GPS antenna to the center console behind where the radio mounts. I mounted the GPS antenna on the passenger side dash just to the left of the speaker grill and tucked the wire along the windshield and fed it down to the passenger foot well.
Removal of the radio is easy and requires only two horseshoe shaped DIN radio removal tools. Some folks recommend simply fabricating these tools from coat hangers but I recommend against that. Insert the DIN tools in the pair of holes on both sides of the original radio and after they snap in place firmly and slowly pull the radio towards you. Once the back of the radio is exposed unplug the three DIN connectors and the antenna cable.
The Traffic Pro will not require the DIN cage which is now exposed so it should be removed. To do this two tabs at the top of the cage and two at the bottom will have to be bent towards the inside of the cage so it can be pulled out.
Connect your harness to plugs A and B. Now connect the GAL/speed line which you ran up from socket H33-2 to the wire connecting to terminal 1 of Plug A.
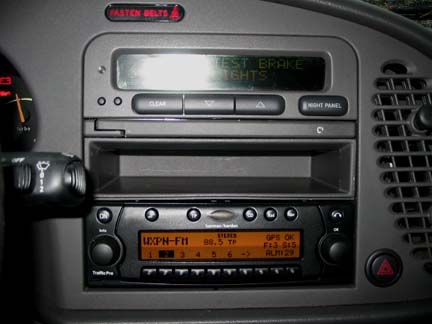
You are now ready to install the Traffic Pro. Hold the radio in front of the 1 ¾ DIN hole and plug in Plugs A and B as well as any options you desire to connect to Socket C (e.g. AUX In, line out). Finally, plug in the GPS antenna cable and the AM/FM antenna. As a 9-3 owner you will be surprised to see that the antenna plug fits directly into the jack on the radio, so you do not require any adapter. If you have a Saab 900 you will need the Motorola adapter. The Traffic Pro will have to be inserted in the lower half of the radio opening and there is insufficient clearance if you try to mount it in the upper position. You may have to experiment with the adjustable locks on either side of the Traffic Pro to get the face of the radio flush, recessed or projected outwards. The choice is your personal preference. Mine is flush mounted. Once it snaps in place, insert the ¾ DIN cubby above until it snaps in place. Saab makes an option that the cubby will snap into. I ordered mine (Saab 400101796) from www.partsforsaabs.com but it arrived after my installation and I found it was not necessary. A friend with a Saab 900 did use it.
Power up the radio and if the car gods are with you it will light up. From that point on, just follow the procedures in the Traffic Pro Installation Guide.
Good luck,
Charlie Mink
Mount Laurel, NJ
July 1, 2007 update: Chaz
wrote on 4-11-06~
I was combing the web last night seeking a source of a device to allow me
to restore steering wheel controls after I finish installation of my Traffic
Pro in my Saab 9-3 and may have found it.
A German firm has two products-one IR remote which interfaces with the Traffic
Pro and one to interface steering wheel controls on several marques including
BMW and Audi/VW (not Saab). The caution on the steering wheel interface is
it requires software version 6.0 which I don't think we have. If that doesn't
work I still think there is a way to interface with steering wheel controls
by installing their IR remote and the installing a product by Pacific Accessory
Corporation (PAC) called SWI-X. (There are some BMW caveats with this, however).
Then the German interface can talk to the SWI-X which then interfaces with
steering wheel controls. I noticed that the SWI-X interfaces will only work
with infrared remotes that use a 40kHz carrier frequency so I have to confirm
with car-com that this is the case with their IR remote.
Link to car-com:
http://www.cc-carcom.com/en/index.html
July 2, 2007 update: Chaz wrote:
Dietz, affirmed that it would work.
Audiotechnik Dietz®, wrote:
"To connect your steering wheel control of your SAAB 9-3 (Year 2000)
you can
use our CAN Bus Interface 61009 plus cable kit 61029. The steering wheel
control input is in plug C3 on the Becker Radio and if you want to install
an iPod Interface to control this you can not use the steering wheel
control. But if you only want to have the audio signal from the iPod into
the AUX In from Becker you can use our part 1301. You can order our parts
at
our distributor in US:
Perzan Auto Radio, INC.
6409 Market St
Upper Darby, PA19082
Tel.: 610-734-1234
eMail: perzanautoradio (at) aol.com"
Charlie

 Esmerelda's Home Page~ Z3ers.com