98 M Roadster Stereo System Upgrade
(aka Z3 Stereo Installation for Dummies)

- CD/MP3 player
- Be able to listen to the music w/ top down at 80+mph
- Must retain a factory/stealth appearance
- No loss of cabin or trunk space
- Cost less than $1000
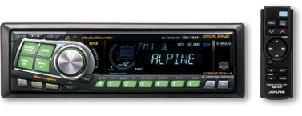
- Alpine CDA-7894 60watt CD/MP3 player head unit
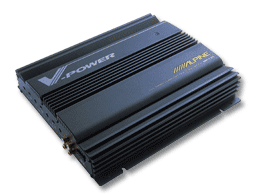
- Alpine MRP-F320 5/4/3 way amp (bridged 3-way: 100Wx2 + 120Wx1)
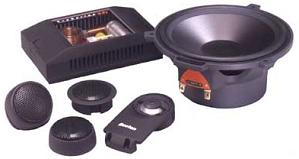
- Boston Acoustics Pro 6.5 6.5” 2-way components for kick panels and door tweeters
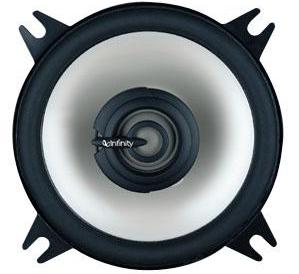
- Infinity Reference REF452I 4” coaxials for rear speakers (powered by HU)
- Z3Bass Subwoofer Enclosure with JL Audio 6w0 6.5” sub
My car was in storage for the winter, and I was not going to put it on the road until late April. I took a little over a month to do all of the research of what I was going to do, which components to buy, and find the cheapest places to buy them. After that, I had almost a month’s time to do the actual install.


I also removed the stock 5.25” speakers at this time.
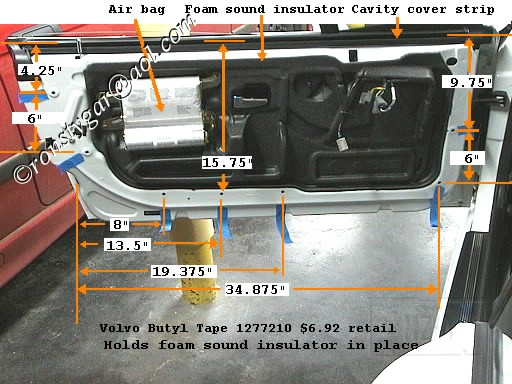
To run wires from the trunk to the cabin you need to go through the rubber grommet on the driver’s side near the strut tower. I could not actually remove the grommet, but you should be able to push a portion of it up from inside the trunk. I used a screwdriver to push it. This will allow you to push your wires through the grommet. Once you have pulled all of your wires all the way through, you should push the piece of the grommet back down from the top, from the inside of the cabin.
Once you have your wires inside the convertible top area, you can run them into where the sub area is. There are 3 screws under plastic tabs that you can remove to help you slide the wires under the plastic piece. Pull the wires all the way out to where the subwoofer speaker grill was. Now run the wires under the center console. In order to run them all the way to the front, I ran them under the center console and then out the side on the passenger side. Then I slid them back up in front and to the opening for the head unit. Then to get the wires to be in the middle of the console, I grabbed one end of the wires in the head unit opening, and grabbed the other end by the subwoofer speaker grill area and pulled them tight. This brought the wires back up under the console and up into the middle. Now arrange the wires so that they are out of the way when you put the storage unit back in and the subwoofer back in. I also tucked them out of the way so that when you open the subwoofer speaker grill, you can’t see them.


Use these tips on re-installing the door panels.

I was able to be a tester for the Z3 Bass sub enclosure. Kevin’s subwoofer comes with very easy instructions, which include using the instructions for the Sunfire sub. The only thing not mentioned for the HK system is that you have to remove the current subwoofer brackets before installing the sub.

Info on my stereo system components:
Alpine CDA-7894 Head Unit
I chose this CD/MP3 player because the display can be amber, which
matches the stock BMW lighting. It has a very powerful 60W (27W
RMS) internal amp. It also has lots of cool powerful features.
I am using it to power the rear 4” coaxial speakers only. I really
like this head unit, and it works well powering the rear speakers.
I could not get the dim on the head unit to work though.
My main constraint on the amp was the size. This was one of the most powerful amps that would fit in the location I wanted. It’s power rating is 40Wx4 + 120Wx1 RMS. I am using it bridged 3-way which has 100Wx2 + 120Wx1 RMS. It powers the BA components and the subwoofer. I’m not sure the amp is powerful enough for the BA’s and the sub. If I turn the volume up over 20, the BA 6.5” woofer component and the sub distort and get muddy. This could be in part because I re-used the stock wires instead of running new ones. It does not have a seperate subwoofer input. Instead, it uses the inputs for the front and rear speakers as the input for the subwoofer as well. I do not like this because my head unit has a subwoofer output that would allow me to fine tune the subwoofer, but because there is no sub input on the amp, I can’t use those features.
I went with the Boston Acoustic 6.5’s since most people recommended them. I heard they work very well with the odd acoustics of the roadster. The tweeters sound nice, but I am disappointed with the mid-low level of the woofer component. I think that they need new wires run instead of re-using stock ones. They may also need more power.
Some people suggest either not upgrading the rears, or just getting cheap coaxials. I found that the rears do contribute a lot. It is important for them to have a wide frequency response, especially in the mid-lower end. They do not need to have crystal clear highs since they fire into the back of the seat, but the mid-low range is important. I chose the Infinity Ref 452I 4” coaxials because the featured a Plus One design which allows the speaker to actually be larger than most 4” speakers. They also have wide frequency response, and can handle a wide range of power. Using the head unit to power the just rear speakers works very well. I am very impressed with the sound quality of these rear speakers powered from the head unit. In fact the BA 6.5 woofer components, and the subwoofer get muddy before the rear 4” speakers or the tweeters distort.
I was looking to use Carl B’s custom subwoofer enclosure. But before Carl posted his instructions, Kevin contacted me about testing his subwoofer. They both use the JL 6w0 sub. Carl’s is a sealed box, whereas Kevin’s is a ported box. Kevin’s box really compliments the system and fills in where the BA’s are lacking, but it doesn't give you that low, powerful bass you get with a real 10" or 12" sub (wishful thinking I guess). It is a tremendous improvement over stock though. On a scale of 1-10, the stock sub would be a 2 and the Z3Bass would be a 7. Kevin’s has detailed instructions, and the install was very easy. If you plan on using the stock subwoofer location for your sub, and don’t want to make an enclosure yourself, I would highly recommend that you get the Z3Bass.com subwoofer enclosure.
Essential
Z3 Stereo reading – Info on stock HK system
http://www.mz3.net/articles/069.html
(Robert’s Stereo Upgrade to Learn From)
Ideas on stereo upgrades – (*ideas on what to take into
consideration)
http://www.mz3.net/articles/068.html
(DC's Stereo Upgrade)
http://www.mz3.net/articles/010.html
(1.9 Non HK Stereo Upgrade w/BA 6.4’s)
http://www.z3bass.com/upgrade_article.jsp
(Kevin’s Stereo Upgrade)
http://www.mz3.net/articles/187.html
(Sound System Upgrade)
http://bimmer.roadfly.org/bmw/forums/z3/forum.php?postid=1939863
(Skyhogg’s)
http://bimmer.roadfly.org/bmw/forums/z3/4633056-5.html
(TexZan Stereo Upgrade)
http://www.bimmerfest.com/forums/showthread.php?t=18693
(Big Book of Car Audio)
Now that you’ve read up on the stock system and possible upgrades, and have now decided on what you want to get, let’s install your new system:
Removing stock head unit
http://www.edoghouse.com/cbishop/skin/skip.htm
(Skin’s CD Skip Fix)
Overview of installing new head unit
http://www.z3roadster.net/articles/detailing_drex_radio_install.asp
(Radio Install Guide)
Installing Alpine 7894 Head Unit (good info for all
HU’s)
http://bimmer.roadfly.org/bmw/forums/z3/forum.php?postid=1936660
(7894 Install)
Running wires from trunk
http://bimmer.roadfly.org/bmw/forums/z3/forum.php?postid=3558126
HK Amp wiring guide
http://bimmer.roadfly.org/z3/messages/archive/msgsy1998w26/22494.html
http://www.mz3.net/articles/070.html
Neat place to mount amps
http://bimmer.roadfly.org/bmw/forums/z3/forum.php?postid=713952
Removing and installing kick panel speakers
http://www.mz3.net/articles/065.html
(MB Quart Replacement Speakers)
Tips on Installing Boston Acoustic 6.5’s
http://bimmer.roadfly.org/z3/messages/archive/msgsy1998w48/44554.html
Removing Door Panel
http://www.unofficialbmw.com/e36/interior/z3_lets_remove_door_panel.html
http://bimmer.roadfly.org/bmw/forums/z3/forum.php?postid=1860758
Installing Door Panel
http://bimmer.roadfly.org/bmw/forums/z3/forum.php?postid=1962816
Replacing Rear 3” speaker with 4” speakers
http://www.mz3.net/articles/219.html
Removing/Replacing stock Rear 4” speakers
http://www.zroadster.net/tim/custom/rear-speakers.html
Removing stock sub
http://mz3.net/articles/064.html
Stock subwoofer rattle fix
http://www.z3bimmer.com/Garage/Fixes/SubwooferRattle/index.html
Kevin’s Custom Sub Enclosure (Z3Bass.com)
http://www.z3bass.com/purchase.jsp
Carl B’s Custom Sub Enclosure (DIY)
http://bimmer.roadfly.org/bmw/forums/z3/forum.php?postid=1563068
Part Number for plastic dash trim screw head caps
http://bimmer.roadfly.org/bmw/forums/z3/forum.php?postid=1970859
http://www.bimmerfest.com/forums/showthread.php?t=18693
Click here to download a Word version of this document.
![]()
 Esmerelda's Home Page~ Z3ers.com